PTU Tutorial - Rose Garden
For this tutorial i am using the amazing artwork by @Caron Vinson
~Supplies Needed~
Tube of choice
Scrapkit used was Les Roses made by Dees'Sign Depot which can be purchased from here
If you do not have this scrapkit please feel free to use another one with similar elements
BigMask made by Vix which can be downloaded from here
~Filters Used~
Eye Candy 4 - Gradient Glow
~Font used~
Carpenter Script
Let's Get Started
Open a 850 x 750 blank canvas - fill with white
Copy & paste frame 5b as a new layer - resize if needed - with your magic wand select the middle of the frame - selections - modify - expand by 5 - copy & paste paper 3 as a new layer - selections - invert - hit delete - selections invert - move the paper so that it's below the frame layer - copy & paste your tube as a new layer (Make sure it's below the frame layer) - selections - invert - hit delete - selections invert - copy & paste your tube again - position - selections - invert - hit delete - selections - invert - repeat this until the whole of inside the frame is filled with your tube - selections - none
Hide the background, frame & paper layer - merge all tube layers visible - unhide all layers - duplicate the tube layer - adjust - blur - gaussian blur - 3.00 - change the blend mode to soft light or screen depending on the colour of your tube - on the original tube layer change the blend mode to luminance (L) - reduce opacity of both layers to around 40-50%
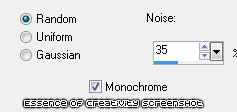
On the frame layer go to selections - all - float - defloat - selections - modify - expand by 2 - add a new raster layer & move it below the frame layer - fill with white - selections - none - adjust - add/remove noise
Add a drop shadow
Copy & paste element 45 as a new layer - position on the top right of the frame - resize to liking - add a drop shadow - copy & paste element 46 as a new layer - resize to liking - add a drop shadow - merge these two together - duplicate & move down slightly - repeat this until all the right side of the frame is full - hide all layers except for the roses - merge visible - unhide all layers - duplicate - image - mirror - merge down - duplicate again - adjust - blur - gaussian - blur - 3.00 - change the blend mode to soft light or screen
Copy & paste element 69 as a new layer - position to the top of the frame so that only the top part of it is shown - move below all layers - add a drop shadow - duplicate - image - flip
Copy & paste spray 4 as a new layer - position to the bottom left of your tag - move below all the layers - duplicate - image - mirror - merge down - duplicate - image flip
Copy & paste any of the elements from the scrapkit as new layers - add drop shadows - position around your tag
Copy & paste your tube as a new layer - selections - all - float - defloat - add a new raster layer - move below your tube - selections - modify - expand by 2 - fill with white - selections - none - apply the same noise settings as earlier - add a drop shadow
Add a new raster layer & move it below all the other layers - fill with a colour from your tube or scrapkit - layers - new mask from image - apply Vix mask - merge group - resize & reduce opacity to liking
With your font add your name - position - apply the same noise settings as earlier - effects - plugins - ete candy 4 - gradient glow - glow width 3.00 - fat setting - add a drop shadow
Don't forget to add the artists correct copyrite - crop around your tag - delete the white background layer and you are done!
