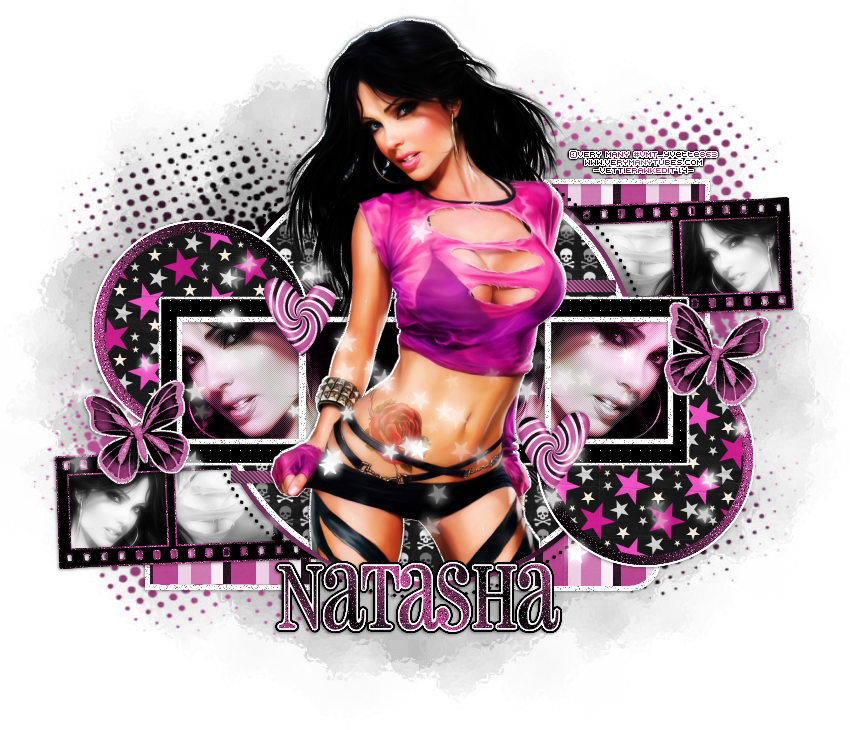
FTU - Starbright

For this tutorial i am using the amazing artwork by @Very Many
~Supplies Needed~
Tube of choice
Scrapkit of choice, i used various pieces from Kristin's scrapkits which can be found here
You can use any scrapkit that you have, that's why i've listed it as FTU
Tag template 485 made by Missy which can be downloaded from here
Halftone-mask-8 made by Dee wchich can be downloaded from here
~Filters Used~
Eye Candy 4 - Gradient Glow
Penta.com - Color Dot & Jeans
VanderLee - Pattern Offset
~Font used~
Pharmacy
Let's Get Started
Open the template & mask in psp - on the template delete the credits layer - image - canvas size - set to 850 x 750 - unhide the background layer & fill with white
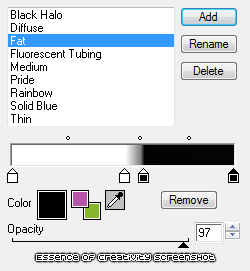
On the blue frame back layer select it with your magic wand - fill with a gradient (Two colours from your tube, choose gradient, repeats 3, angle 45) - copy & paste your tube as a new layer - position to the left of the frames - it doesn't matter if it overlaps into the middle frames - selections - invert - hit delete - selections - none - duplicate your tube - image - mirror - merge together
Duplicate your tube layer - adjust - blur - gaussian blur - 3.00 - change the blend mode to soft light (depending on your tube you might want to play around with the blend modes) - effects - plugins - vanderlee - pattern offset

Change the blend mode of the original to luminance (L)
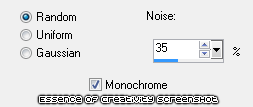
On the white frame layer go to adjust - add/remove noise

Add a drop shadow
On the black rectangle layer go to effects - plugins - penta.com - color dot

Add a drop shadow to the white noise rectangle layer
Merge together the grey circle layers - selections - all - float - defloat - copy & paste a paper as a new layer - selections invert - hit delete - selections none - delete the original layer
Merge together the blue circle layers - selections - all - float - defloat - add a new raster layer & fill with a gradient - apply the same noise settings as earlier - selections modify - expand by 2 - fill the original layer with white - selections none - add a drop shadow
Merge together the pink thin rectangle layers - selections - all - float - defloat - add a new raster layer - fill with a gradient - selections - none - effects - penta.com - jeans

Add a drop shadow & delete the original layer
On the black circle layer - selections - all - float -defloat - copy & paste a paper as a new layer - selections none - i changed the blend mode to luminance (L) but that's up to you - delete the original layer - on the pink circle layer selections - all - float - defloat - add a new raster layer - fill with black - selections - none - add a drop shadow & delete the original layer
On the right grey filmstrip back layer select with your magic wand - fill with black - copy & paste your tube into each section of the frame - selections - invert - hit delete - selections none - adjust - hue & saturation - colourize - set both sliders to 0
Merge together all your tubes - duplicate - adjust - blur - gaussian blur - 3.00 - change the blend mode to screen
On the filmstrip layer - selections - all - float - selections modify - expand by 2 - add a new raster layer & move it below the frame layer - fill with a gradient - selections - none - apply the same noise settings as earlier - add a drop shadow
Repeat the above steps for the filmstrip on the left side
I did these last few layers i applied the same paper to them all - add drop shadows to the remaining layers
Copy & paste your tube as a new layer - position - duplicate - adjust - blur - gaussian blur - 3.00 - change the blend mode to soft light - on the original layer - selections - all - float - defloat - add a new raster layer & move it below your tube layer - selections - modify - expand by 2 - fill with white - selections - none - apply the same noise settings as earlier - add a drop shadow - with your eraser tool erase the bottom of your tube so that it looks like it is sitting inside on of the circle layers
Add a new raster layer & move it below all your layers - fill with a gradient - layers - new mask from image - apply the mask - merge group
Copy & paste any scrap elements from the scrapkit you are using - position around your tag - add drop shadows
With your font add your name - position - apply the same noise settings as earlier - effects - plugins - eye candy 4 - gradient glow - glow width 3.00

Add a drop shadow
Don't forget to add the artists correct copyrite - crop around your tag - delete the white background layer and you are done!
