PTU Tutorial - Toxic Poison
Which you can purchase from www.arthurcrowesfactory.com
~Supplies Needed~
Tube of choice
Scrapkit used was Poison made by Kristin which can be purchased from here
If you do not have this scrapkit please feel free to use another one
Tag Template 170 also made by Kristin and can be downloaded from here
Mask of choice. I'm using Mask 3 ttl. {If you know who this mask belongs to can you please let me know then i can give them credit, thank you}
~Filters Used~
Dsb Flux - Bright Noise
Eye Candy 4 - Gradient Glow
Xero - Radiance & Fritillary
~Font used~
TheNautiGal
Let's Get Started
Open Kristin's template in psp - image - canvas size - change to 800 x 750 - delete the credit layer - add a new raster layer & move so that it's below all the other layers - fill with white
On the black circle layer - selections - float - defloat - copy & paste a paper as a new layer - selections - invert - hit delete - selections none - copy & paste the round frame as a new layer - resize so that it fits nicely around the paper layer - add a drop shadow
On the paper layer go to effects - xero - fritillary
On the left circle layer - selections - float - defloat - choose 2 colours from your tube/kit - select gradient - foreground & background - repeats 3 - angle 45 - add a new raster layer & fill with your gradient - copy & paste your tube as a new layer - position - selections invert - hit delete - selections - invert - selections modify - expand by 4 - on the original layer fill with white - effects - plugins - dsbflux - bright noise - set to 50% - add a drop shadow
Back on the tube layer - duplicate - on the original change the blend mode to luminance (L) - on the duplicate go to adust blur - gaussian blur - 3.00 - change the blend mode to soft light - effects plugins - xero - radience
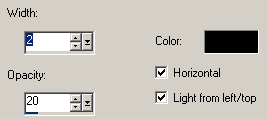
Effects - texture effects - blinds
Repeat these steps for the right circle
Merge together the purple rectangle layers {Slanted ones} - selections - float - defloat - copy & paste a paper as a new layer - selections - invert - hit delete - selections - invert - selections modify - expand by 4 - on the original layer fill with your gradient {Use another colour from your tube} - selections - none - effects - plugins - dsbflux - apply the same settings as earlier - add a drop shadow
Merge together the blue rectangle layers - selections - float - defloat - copy & paste a paper as a new layer - selections - invert - hit delete - selections - invert - selections modify - expand by 4 - on the original layer fill with your gradient {Use another colour from your tube} - selections - none - effects - plugins - dsbflux - apply the same settings as earlier - add a drop shadow
Merge together the other purple rectangle layers - selections - float - defloat - copy & paste a paper as a new layer - selections - invert - hit delete - selections - invert - selections modify - expand by 4 - on the original layer fill with your gradient {Use another colour from your tube} - selections - none - effects - plugins - dsbflux - apply the same settings as earlier - add a drop shadow
Merge together the black rectangle layers - selections - float - defloat - copy & paste a paper as a new layer - selections - invert - hit delete - selections - invert - selections modify - expand by 4 - on the original layer fill with your gradient {Use another colour from your tube} - selections - none - effects - plugins - dsbflux - apply the same settings as earlier - add a drop shadow
Copy & paste you tube as a new layer - position - duplicate - adjust - blur - gaussian blur - 3.00 - change the blend mode to screen - reduce opacity to liking
Copy & paste the wordart as a new layer - position to the right - effects - plugins - eye candy - gradient glow - glow width 3.00
Add a drop shadow - duplicate - image - mirror - image - flip
Add any elements from the kit you are using & position them around your tag - add drop shadows {I also added gradient glows to make them stand out more}
With your font add your name - position - apply the same dsbflux & gradient glow settings as earlier - add a drop shadow
Add a new layer & move it below all the other layers - fill with a gradient of choice - layers - new mask from image - merge group - resize if needed - apply the same fritillary settings as earlier
Don't forget to add the artists correct copyrite - save tag and you are done!


